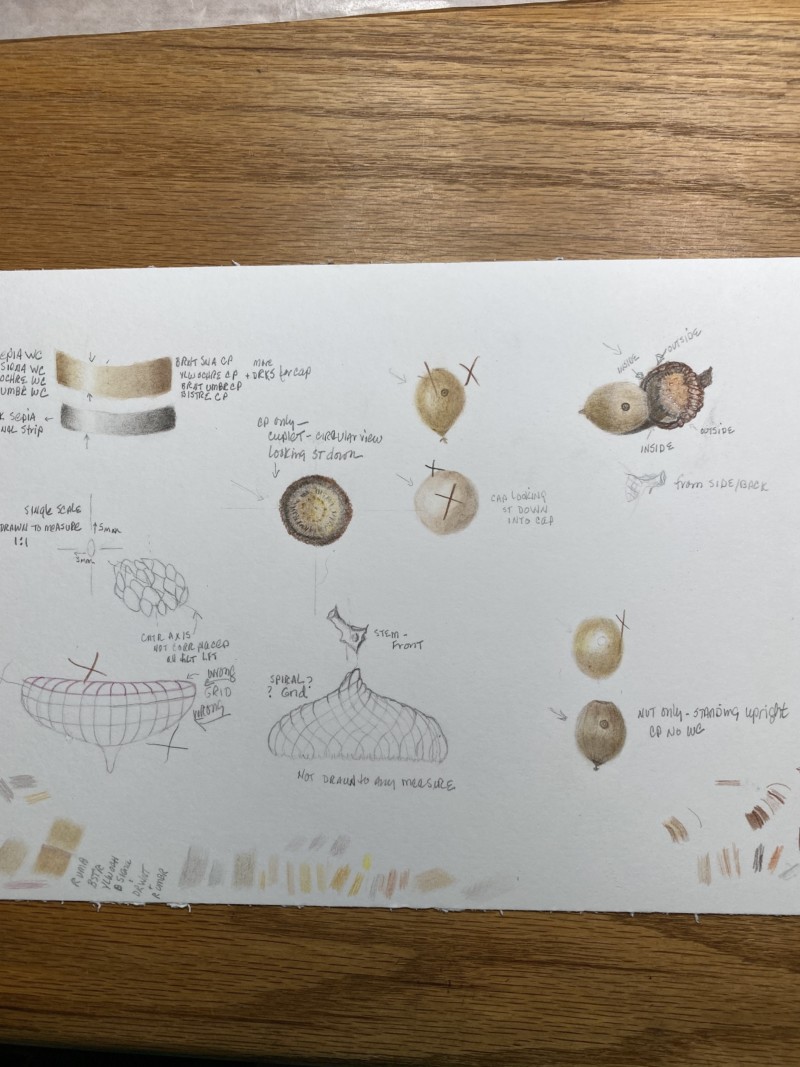
There are portions of this worksheet that I liked, but overall, this work needs more practice. One of the biggest challenges for me is trying to render tiny details in a very small space. I know that Wendy said there is flexibility when rendering scales on an acorn, but there are also a lot of details inside the cuplet that can be very hard to render, unless the cup is magnified in the drawing. Latter is a skill I need to practice. FYI — I found the drawing in the upper right hand portion of the page especially difficult. But I’ve spent so many hours on this by now that I decided to submit the page and move on to the next exercise. Also — can you provide input on whether the grid I drew, the one without the large Xs around it, is correct for acron scales? And thanks in advance for any input you have. Just great to be taking this course and have your helpful input all the way through. And stay healthy!
Hi Mary- I am glad you are enjoying the course! Acorns are great subjects because there is such diverse characteristics in a small subject. The nut itself is smooth and shiny and the caps are heavily textured and have a matte finish to name just a couple of the differences. Thanks for sending along the separate photo of the view that was giving you the most trouble. It is a tricky view, in addition to the lighting on the subject is strong (maybe too close) and the shadows you would expect to see on the nut itself are not there. For the nut to have it’s form on your drawing you have to have dark toning thru mid-tones and of course a highlight. If you don’t have these on a drawing your subject is just going to read as being flat with no form. If you don’t see those shadows and highlights on your subject you either have to correct your lighting or if you feel confident you know where that toning should be, draw it on. At some point knowing where to put those tones will become second nature. I would expect the highlight to be slightly above the center (height) of the nut and a little left of center (width). The darkest toning would be on the bottom and toward the back of the nut where it meets the cap. Plus of course some mid-tones between the darkest area and the highlight area. The interior of the cap would have a shadow cast by the nut in addition to having some shading to convey that the interior of the cap is curved. The right side view of the cap should have some dark toning on it because the back part of the cap would be in shadow. You illustrated the interior cap well and I think if you toned the nut and the side of the cap as I mentioned above, I think you will find this to be a successful drawing. One thing that you might also find helpful is to draw the acorn in a larger scale. Double or triple the size and see if that does not make it easier for you. Many artists work that way especially on smaller subjects. Lastly, I looked at acorn caps I have here and also on line and to me the design of the cap is the one on the right with the diagonal pattern. I hope this helps. Keep up the good work and stay safe. Let me know if a sketch if what I described would make it easier for you.
Me again! I was just scrolling thru the ArtFeed and there are a number of very successful acorn studies back in January that would be worth checking out!
09 April 2020
This is a great page, Mary. I can tell that your practice will pay off. Good suggestions from Doug about drawing at a larger scale and toning to show 3d form. Yes, the pattern on the cup without the “x”s seems correct. Great work. Keep going! 🙂
Thanks so much for your comments, Doug and Vern. It’s amazing how much time slips by when getting set up for virtual activities, each using a different app/virtual system. I can’t agree more about Doug’s suggestion to scale small things up before starting to draw, and tone. I have one of those Accura Proportional dividers but am rusty on how to use it. Do we cover that later on in the course? And thanks also for helpful comments re toning, again, something to practice on acrons once they are scaled up. In the meantime, thank you so much for your help. Really enhances the learning in this course.
There are portions of this worksheet that I liked, but overall, this work needs more practice. One of the biggest challenges for me is trying to render tiny details in a very small space. I know that Wendy said there is flexibility when rendering scales on an acorn, but there are also a lot of details inside the cuplet that can be very hard to render, unless the cup is magnified in the drawing. Latter is a skill I need to practice. FYI — I found the drawing in the upper right hand portion of the page especially difficult. But I’ve spent so many hours on this by now that I decided to submit the page and move on to the next exercise. Also — can you provide input on whether the grid I drew, the one without the large Xs around it, is correct for acron scales? And thanks in advance for any input you have. Just great to be taking this course and have your helpful input all the way through. And stay healthy!
Hi Mary- I am glad you are enjoying the course! Acorns are great subjects because there is such diverse characteristics in a small subject. The nut itself is smooth and shiny and the caps are heavily textured and have a matte finish to name just a couple of the differences. Thanks for sending along the separate photo of the view that was giving you the most trouble. It is a tricky view, in addition to the lighting on the subject is strong (maybe too close) and the shadows you would expect to see on the nut itself are not there. For the nut to have it’s form on your drawing you have to have dark toning thru mid-tones and of course a highlight. If you don’t have these on a drawing your subject is just going to read as being flat with no form. If you don’t see those shadows and highlights on your subject you either have to correct your lighting or if you feel confident you know where that toning should be, draw it on. At some point knowing where to put those tones will become second nature. I would expect the highlight to be slightly above the center (height) of the nut and a little left of center (width). The darkest toning would be on the bottom and toward the back of the nut where it meets the cap. Plus of course some mid-tones between the darkest area and the highlight area. The interior of the cap would have a shadow cast by the nut in addition to having some shading to convey that the interior of the cap is curved. The right side view of the cap should have some dark toning on it because the back part of the cap would be in shadow. You illustrated the interior cap well and I think if you toned the nut and the side of the cap as I mentioned above, I think you will find this to be a successful drawing. One thing that you might also find helpful is to draw the acorn in a larger scale. Double or triple the size and see if that does not make it easier for you. Many artists work that way especially on smaller subjects. Lastly, I looked at acorn caps I have here and also on line and to me the design of the cap is the one on the right with the diagonal pattern. I hope this helps. Keep up the good work and stay safe. Let me know if a sketch if what I described would make it easier for you.
Me again! I was just scrolling thru the ArtFeed and there are a number of very successful acorn studies back in January that would be worth checking out!
This is a great page, Mary. I can tell that your practice will pay off. Good suggestions from Doug about drawing at a larger scale and toning to show 3d form. Yes, the pattern on the cup without the “x”s seems correct. Great work. Keep going! 🙂
Thanks so much for your comments, Doug and Vern. It’s amazing how much time slips by when getting set up for virtual activities, each using a different app/virtual system. I can’t agree more about Doug’s suggestion to scale small things up before starting to draw, and tone. I have one of those Accura Proportional dividers but am rusty on how to use it. Do we cover that later on in the course? And thanks also for helpful comments re toning, again, something to practice on acrons once they are scaled up. In the meantime, thank you so much for your help. Really enhances the learning in this course.