Flower Anatomy for Artists
A Botanist’s Drawing Guide to Shapes, Symmetry, & Structure
If you’ve ever been fascinated by a flower, this post is for YOU!
A flower is the reproductive part of a plant. Its primary purpose? To attract!
How do these alluring seed-bearing wonders do it? Let’s examine the captivating forms, vibrant colors, and enchanting fragrances flowers use, along with their promise of sweet nectar, to make themselves irresistible to any pollinator (or person!). Prepare to be captivated by the mesmerising world of flowers!
Scroll for helpful information on drawing flowers, or click below to jump to a specific section:
+ Botanical Fun Facts
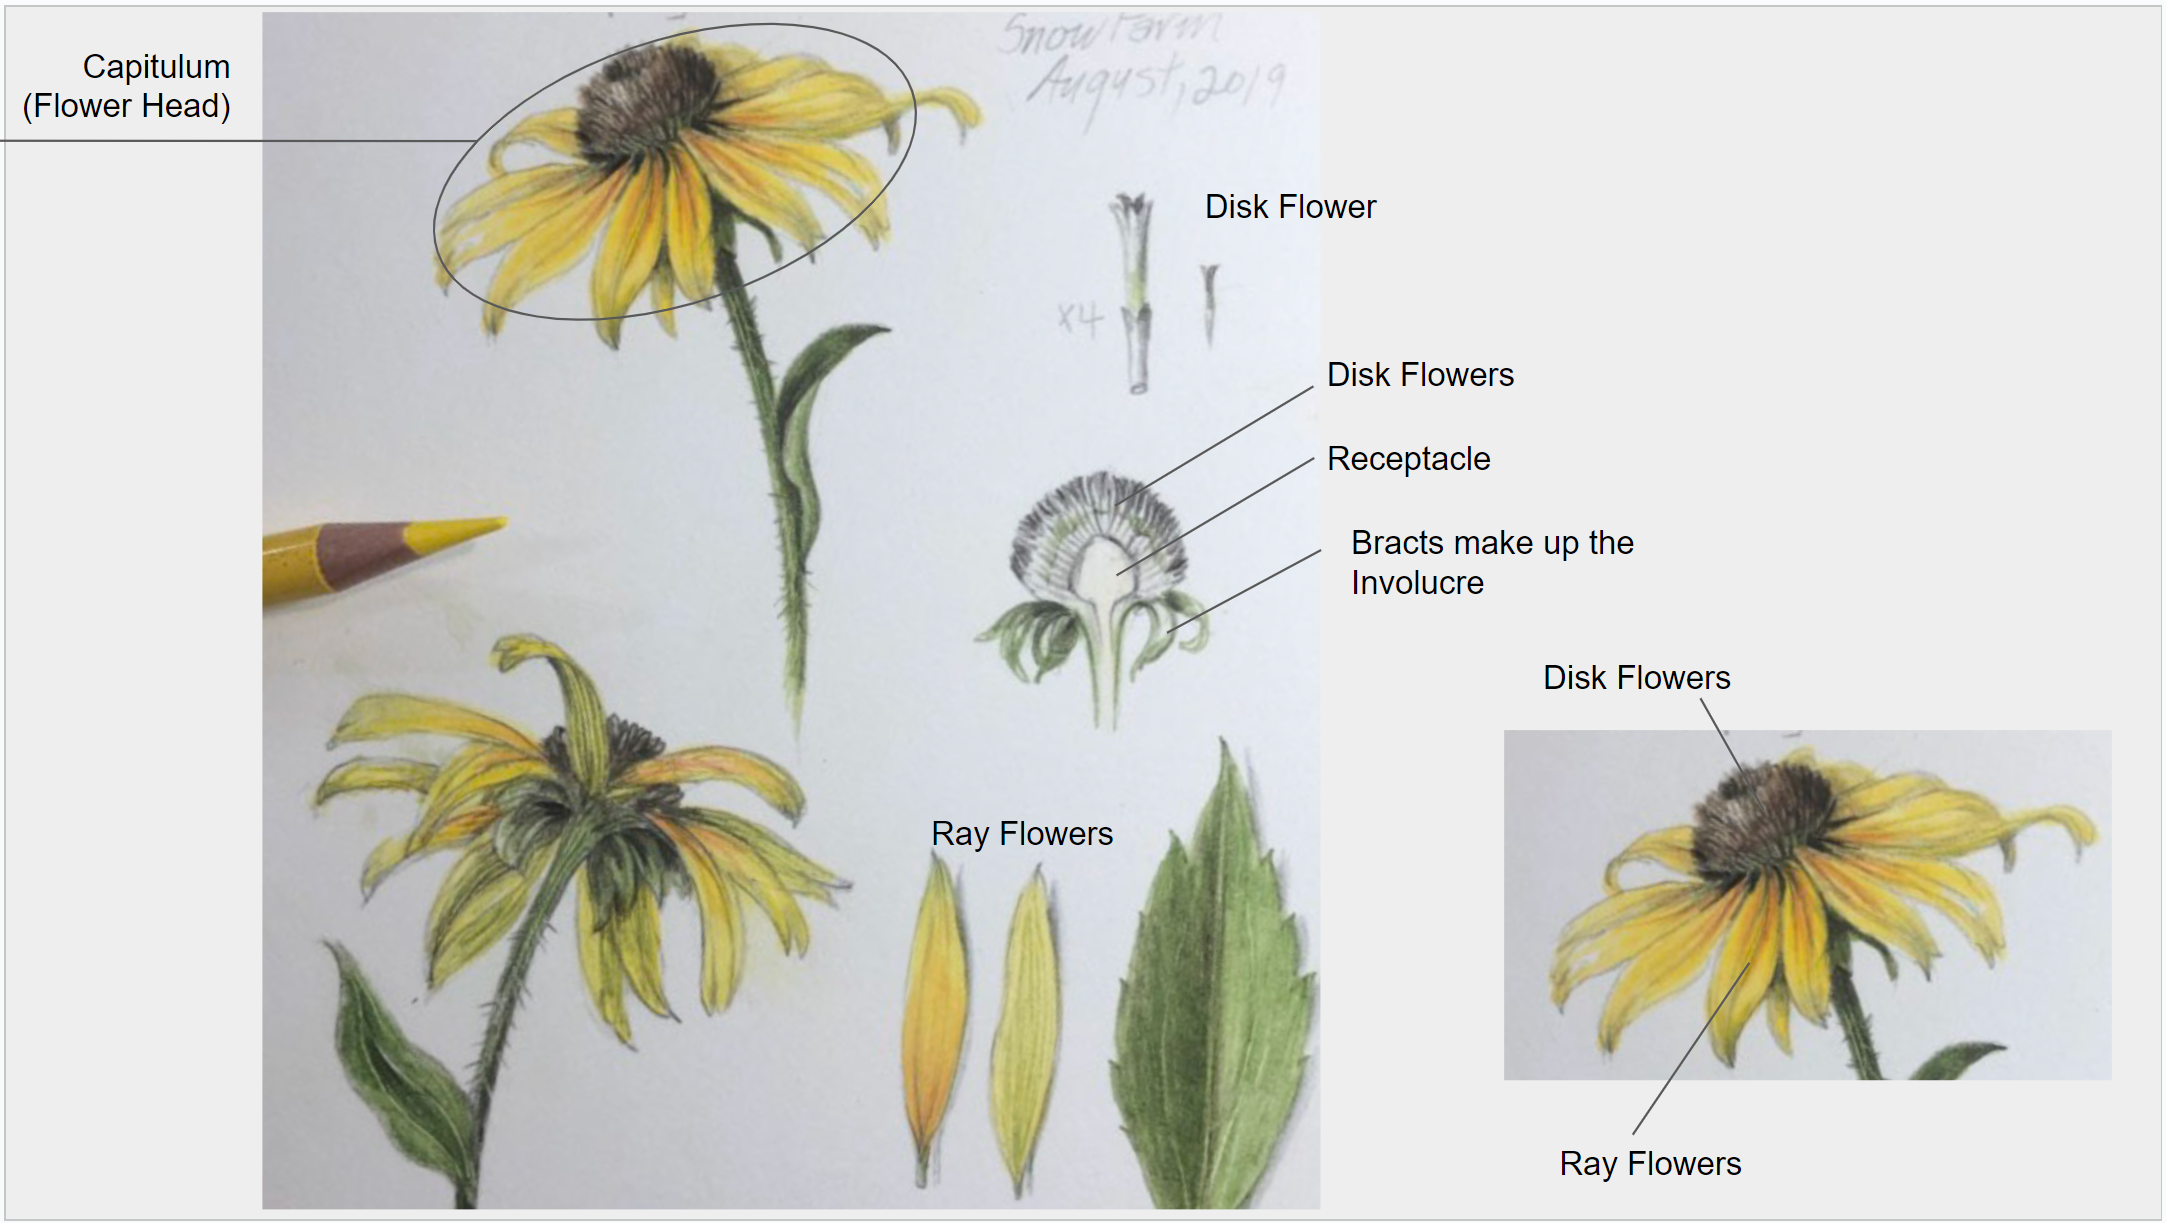
– Reference Quick Guide: Parts of a Flower
+ Flower Drawing Tips
– Shapes: Start Simple
– Symmetry: The Secret to Successful Flowers
+ DIY Reference Tools
– Herbarium Page
– Study Page

Botanical Fun Facts
Before we pick up our pencils, let’s take a moment to marvel at what we’re drawing. Of the nearly 400,000 species of land plants described, nearly 90% are flowering plants known as angiosperms. There are 350,000+ species of angiosperms classified into 400+ families! However, most of their diversity can be found in a few major families – the Asters / Composites (32,000), Orchids (28,000), Legumes (19,000), and Grasses (12,000). (Source)
A wonder-full fact: the evolutionary success of angiosperms is largely attributed to their coevolutionary relationships with animal pollinators. Flowers developed specialized traits such as nectar production, vivid pigmentations, and complex volatile scents to attract specific floral visitors. Every choice a flower makes in color, shape, and fragrance is purposeful, and understanding that purpose makes for richer, more intentional art. (Source)

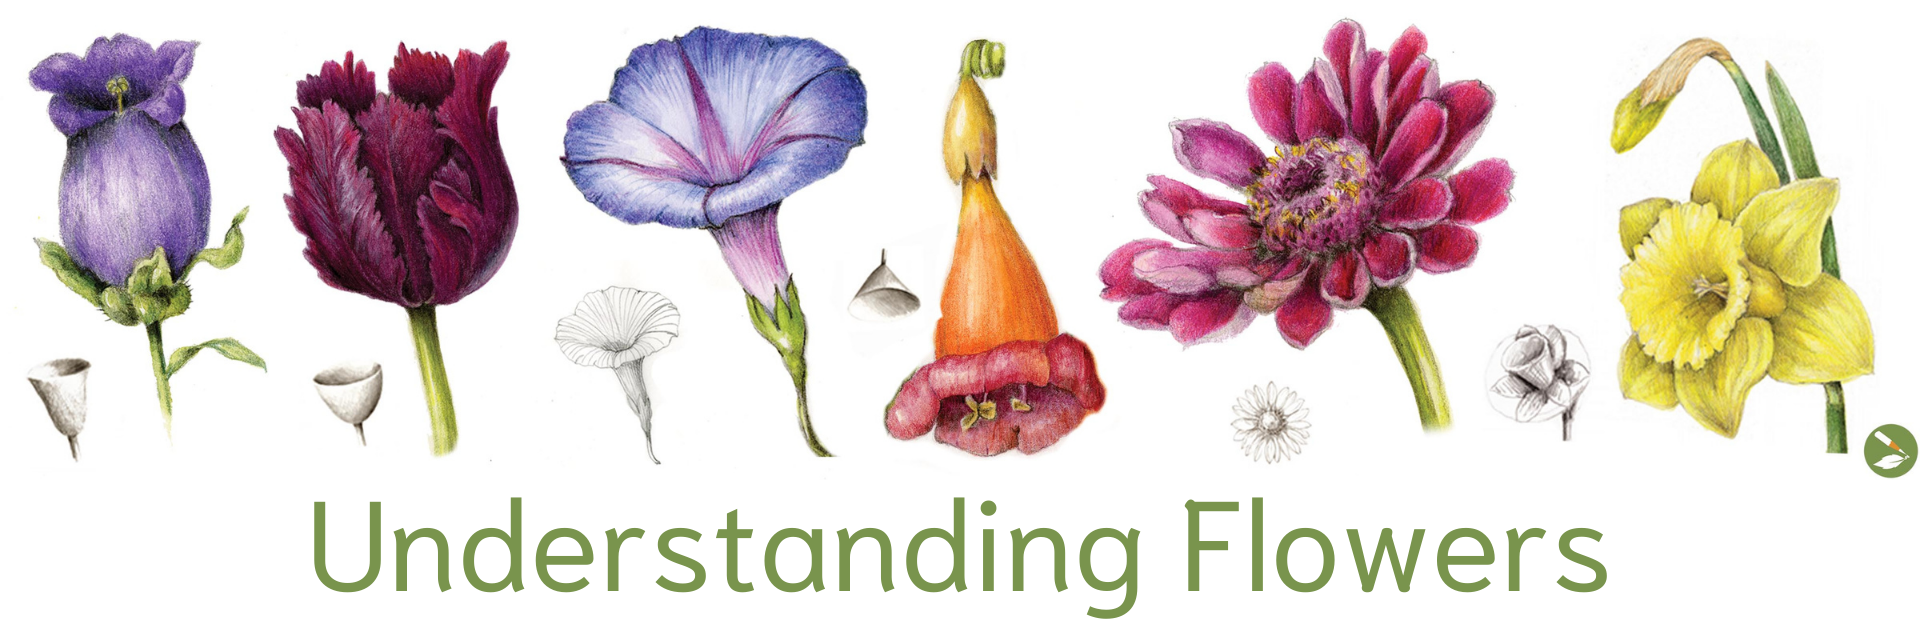
Flowers vary enormously, but most share a common cast of characters. The sepals and petals together make up the perianth, or floral envelope. Sepals are usually greenish and often resemble reduced leaves, while petals are usually colorful and showy. The male parts of the flower (androecium) comprise the stamens, each of which consists of a supporting filament and an anther in which pollen is produced. The female parts (gynoecium) comprise one or more pistils, each consisting of an ovary, a style, and a stigma (pollen-receptive surface). (Source)
Reference Quick Guide: Parts of a Flower
Here’s a quick reference for the parts you’ll encounter most often in botanical illustration:
•Petals: the parts of a flower that are often conspicuously colored, and what most people picture first. (Source)
•Sepals: small modified leaves located around the base of a flower that support and protect the other flower parts while the flower is closed. (Source)
•Stamen: the male reproductive organ, consisting of a pollen sac (anther) and a long supporting filament that holds the anther in position, making pollen available for dispersal. (Source)
•Pistil: the female part, generally shaped like a bowling pin and located in the flower’s center, consisting of a stigma, style, and ovary. (Source)
•Ovary/Ovules: the ovary contains eggs which reside in ovules; if an egg is fertilized, the ovule develops into a seed. (Source)
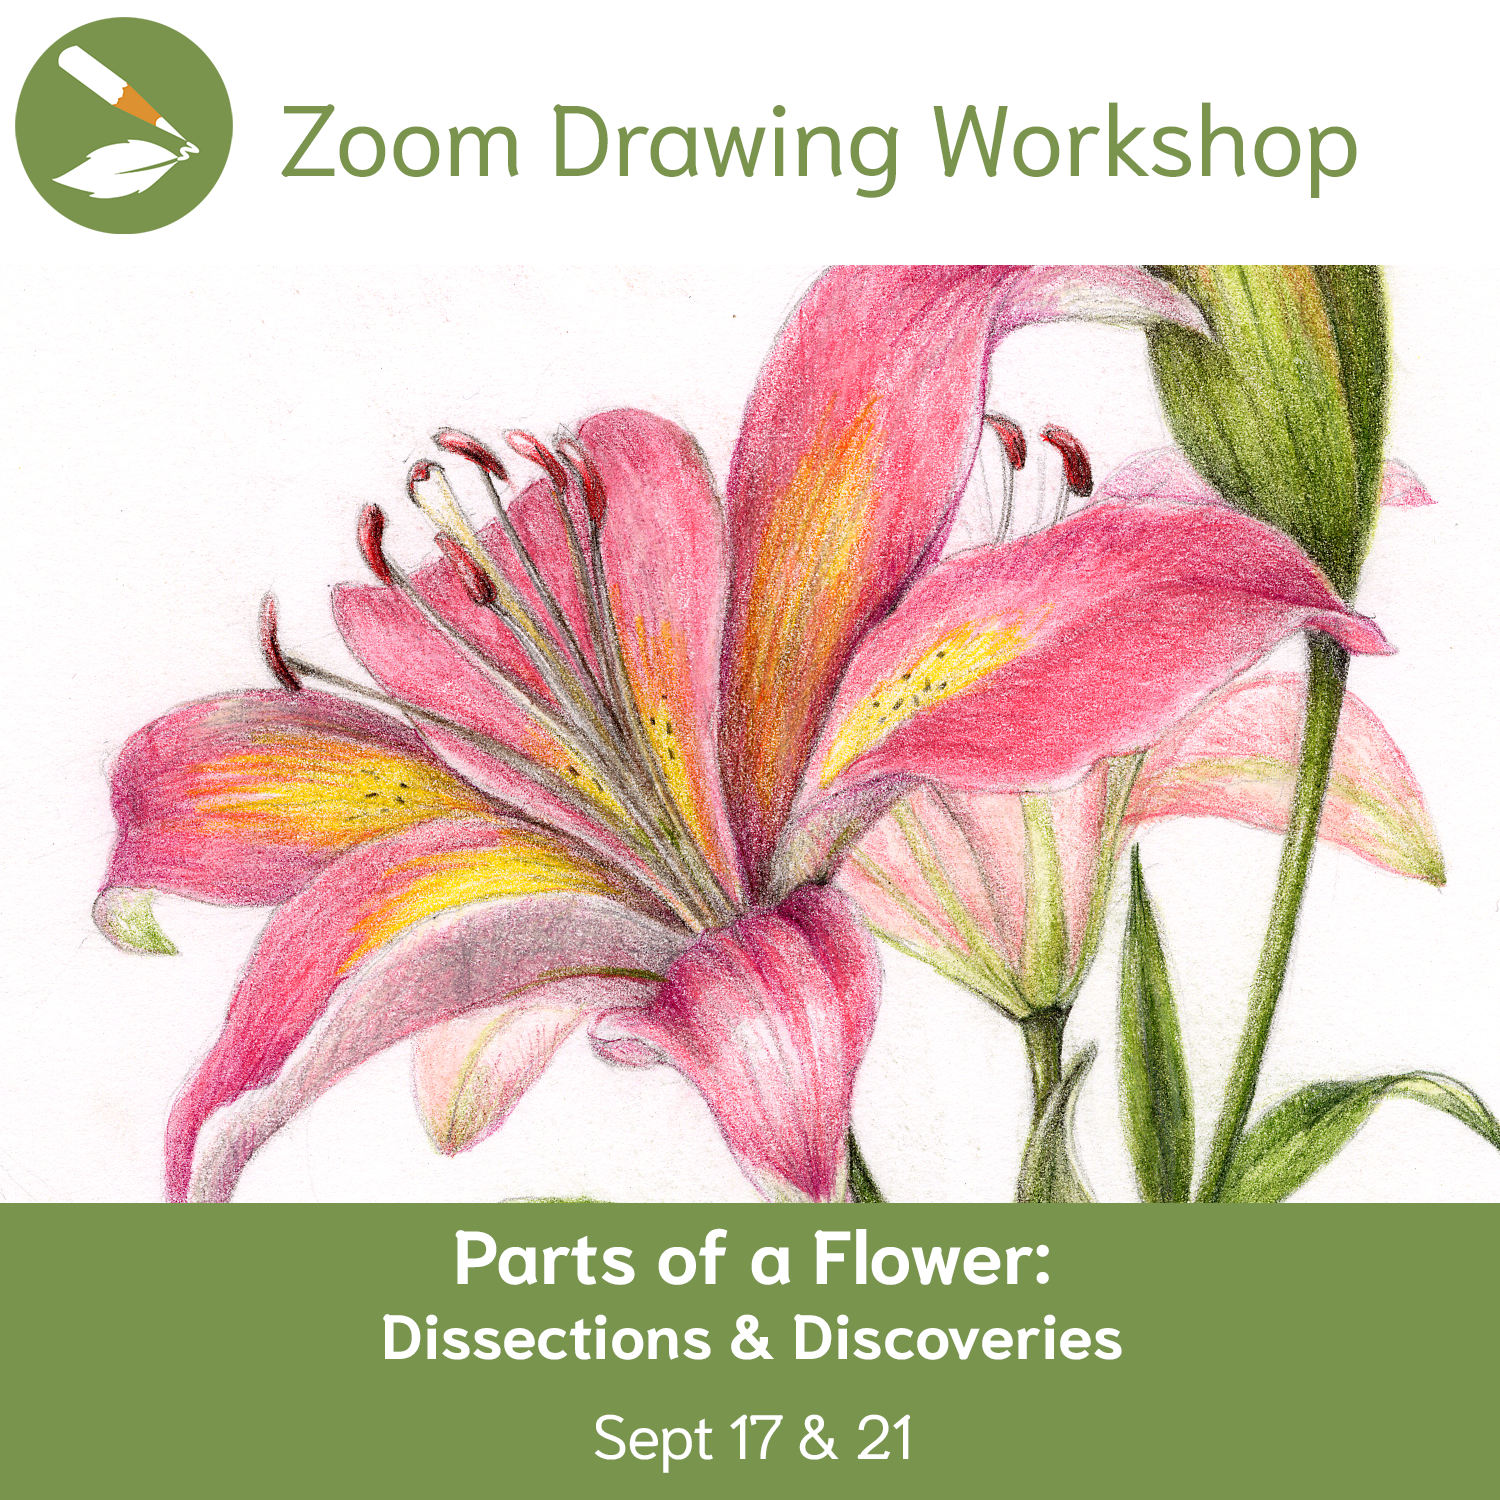
For a deep dive on flowers and their parts, check out the recording of our Parts of a Flower: Dissections & Discoveries Zoom Workshop!
PS- If you missed our live Zoom workshop on Composite Flowers: Daisies, Zinnias, & Coneflowers, click here to purchase a recording. For other recordings, check out our new Zoom Workshops Archive!
Flower Drawing Tips
Shapes: Start Simple
When you sit down to draw a flower, resist the urge to jump straight into petals and details. Instead, train your eye to see the flower as a simple geometric form first. Familiarizing yourself with the different parts of a flower and understanding its components will help you portray their unique forms and arrangement accurately.
Here are the most common flower shapes you’ll find:
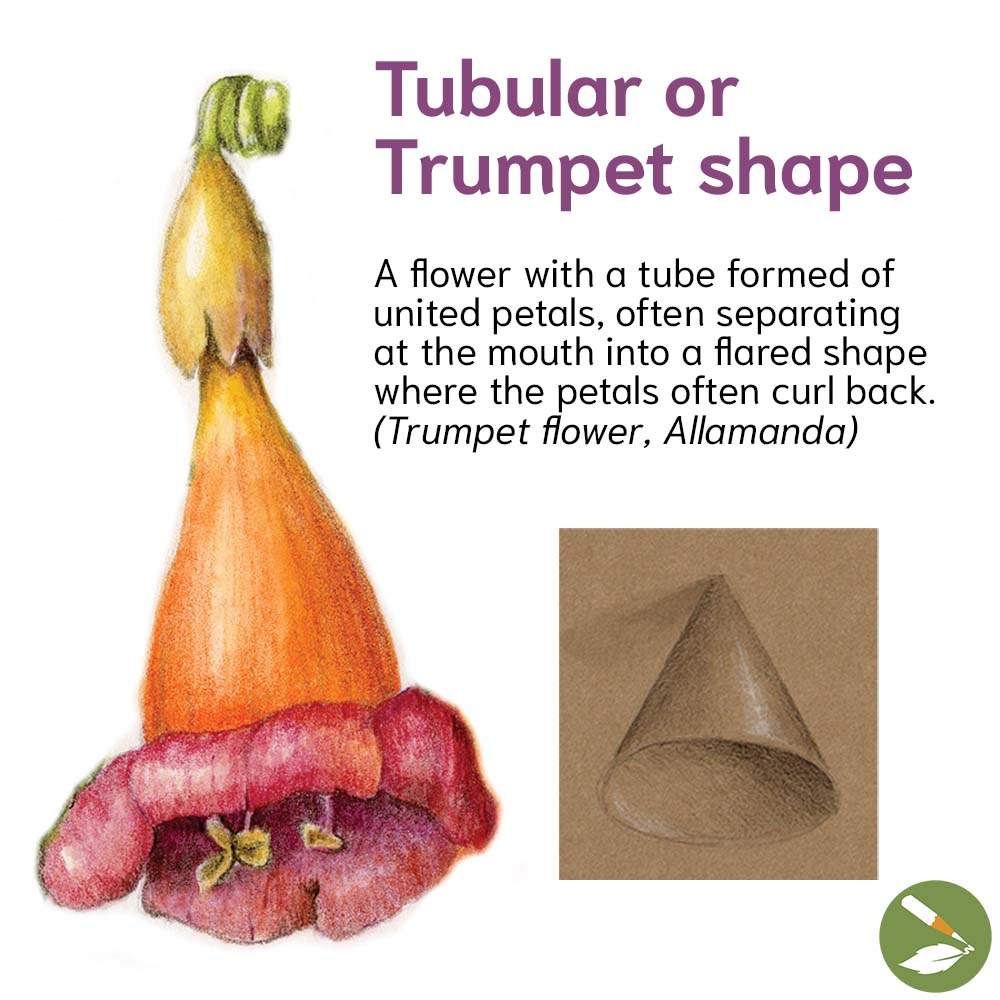
Tubular or Trumpet shape
A flower with a tube formed of united petals, often separating at the mouth into a flared shape where the petals often curl back. (Trumpet flower, Allamanda)
🎨 Challenge: Include a pollinator in your botanical composition!
“Flowers with long spurs attract butterflies and birds (like hummingbirds or sugarbirds).” (Source)
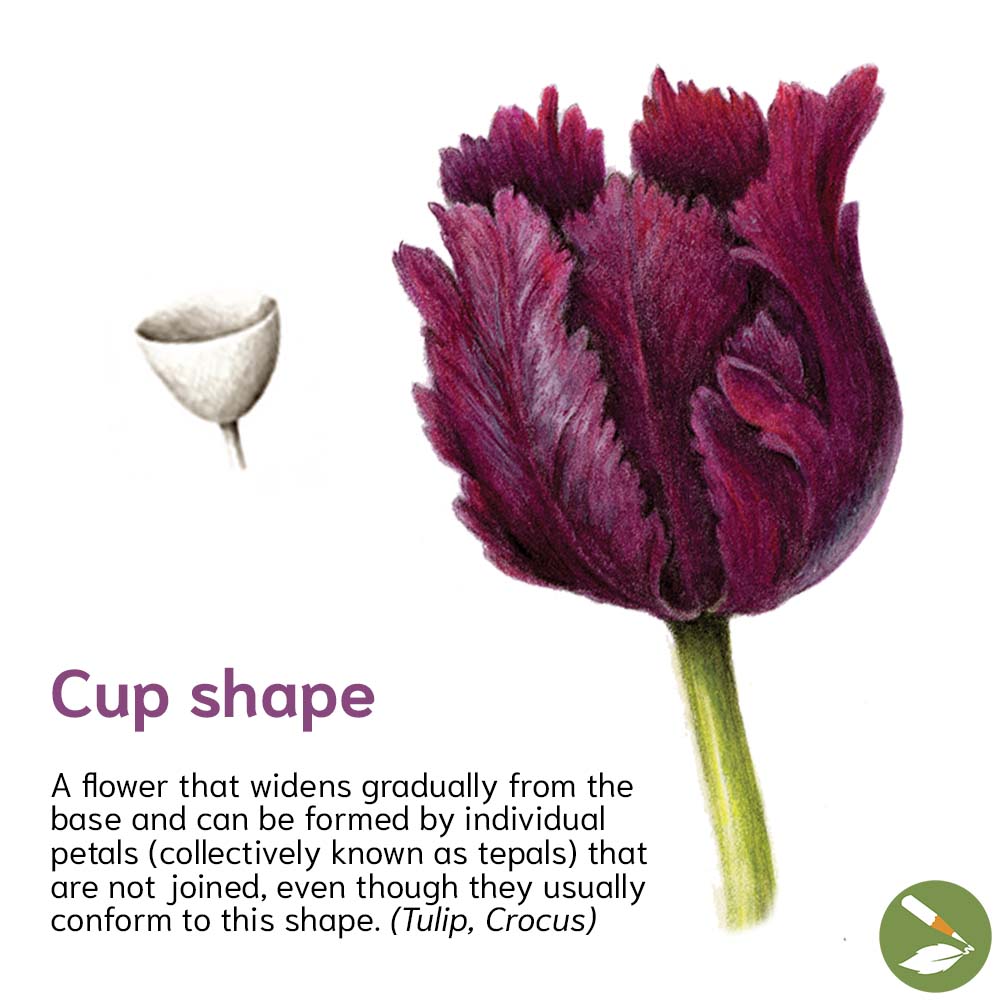
Cup shape
A flower that widens gradually from the base and can be formed by individual petals (collectively known as tepals) that are not joined, even though they usually conform to this shape. (Tulip, Crocus)
Beginner Resource: Learn how to draw a tulip for FREE here – How To Draw a Tulip in 12 Easy Steps
“Cup-shaped flowers are usually pollinated with massive animals like beetles and even bats.” (Source)
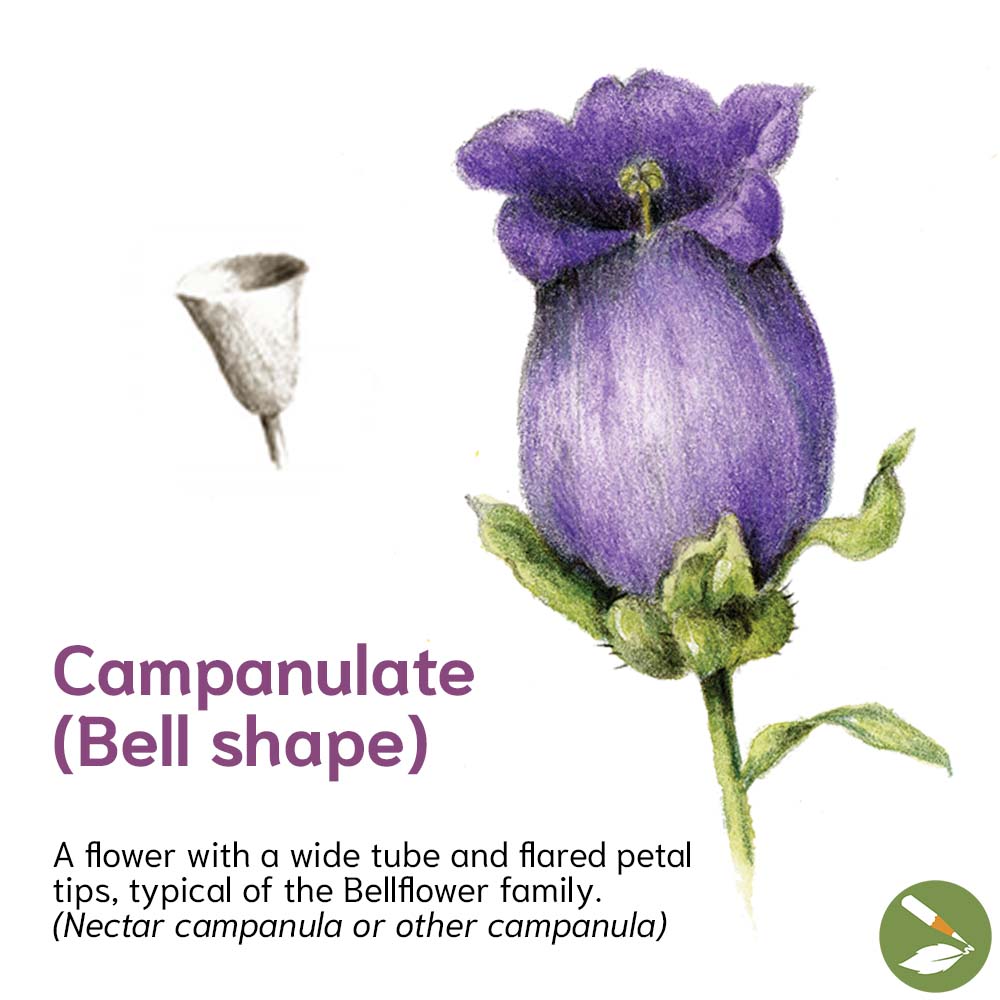
Campanulate or Bell shape
A flower with a wide tube and flared petal tips, typical of the Bellflower family. (Nectar campanula or other campanula)
Pay special attention to how the tube narrows at the base. Getting this transition right is what gives bell-shaped flowers their characteristic elegance.
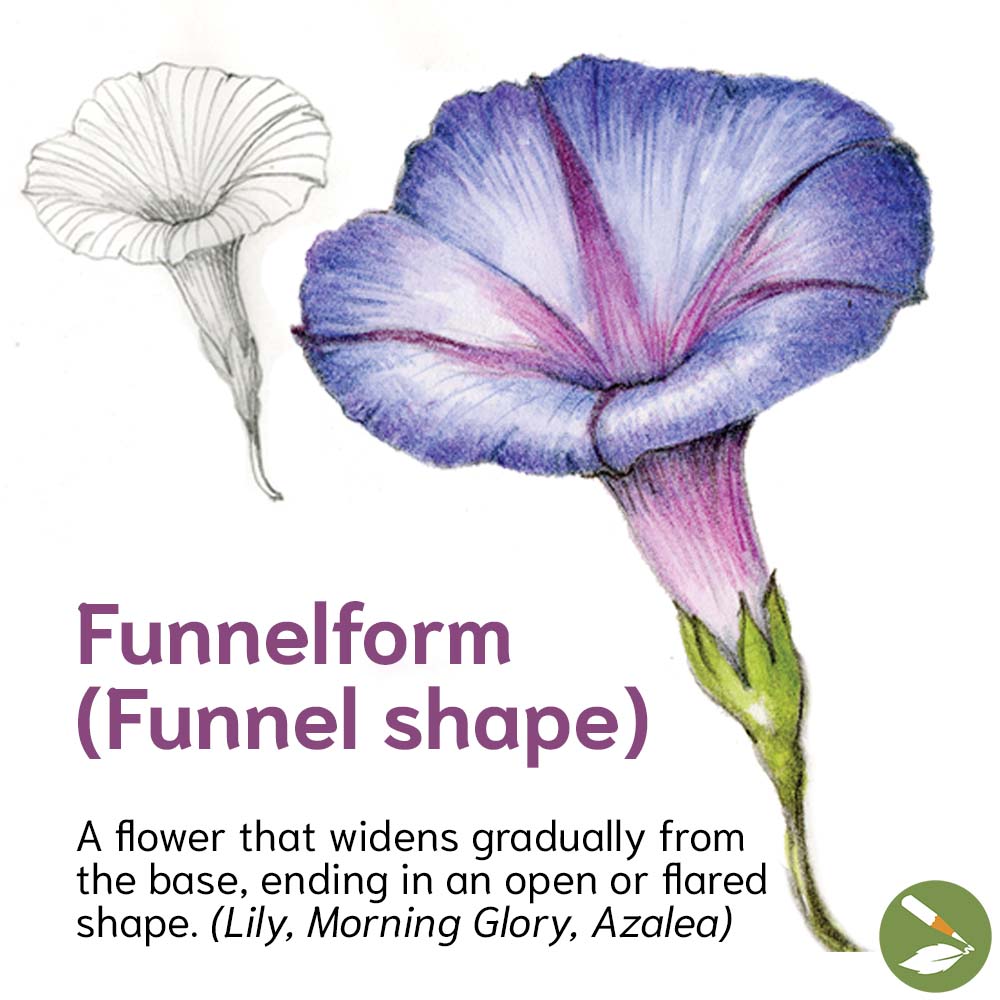
Funnelform (Funnel) shape
A flower that widens gradually from the base, ending in an open or flared shape. (Lily, Morning Glory, Azalea)
“Funnel-shaped flowers as well as labiate flowers (with lips), are adapted to flies and bees.” (Source)
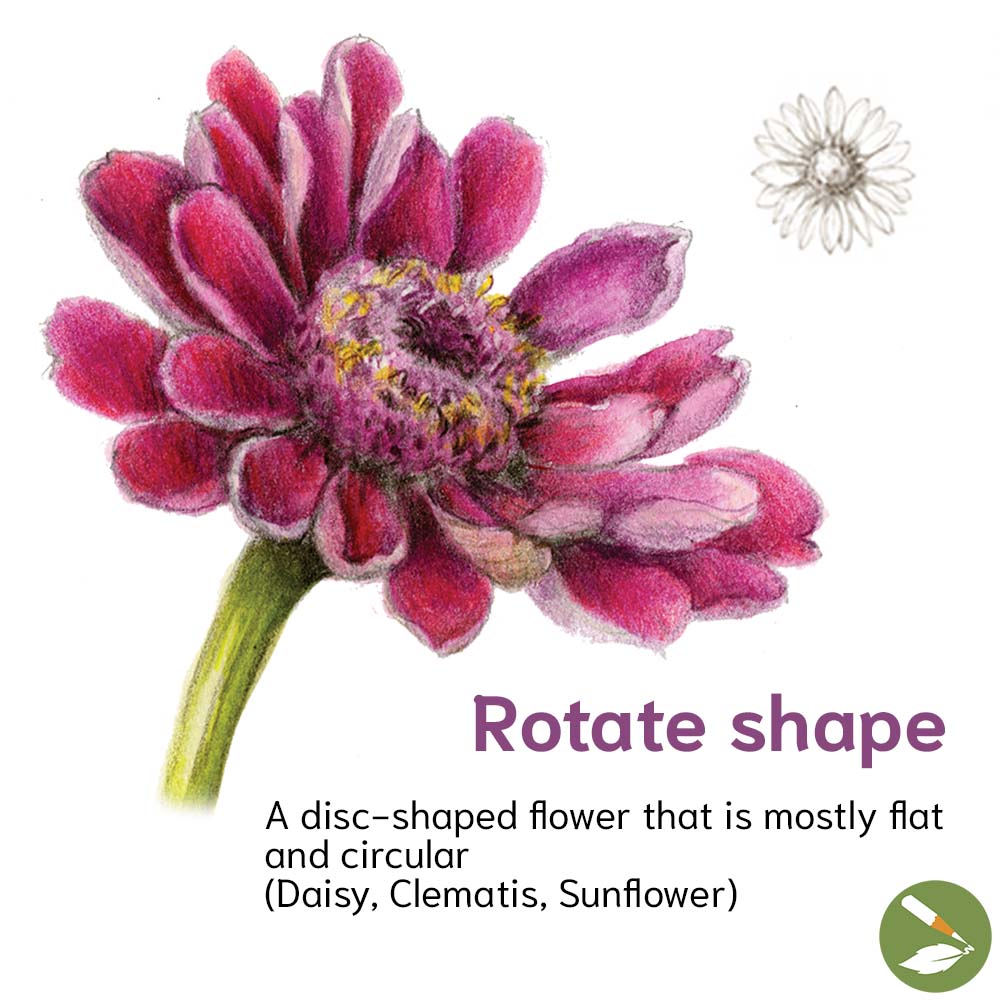
Rotate shape
A disc-shaped flower that is mostly flat and circular. (Daisy, Clematis, Sunflower)
Composite flowers have so much to teach us! All of their petals are perfect for practicing overlaps; their adorable, fuzzy-looking centers are great practice for drawing textures and fibonacci patterns; and their circular form makes foreshortening simple and easy to understand. Watch round circles become ellipses as we draw flowers from different perspectives.
Learn about the botany of inflorescences, their fascinating reproductive parts, and how each petal is actually an individual flower connected to a shared stalk!
Learn more & buy the recording from our Composite Flowers Zoom Drawing Workshop here
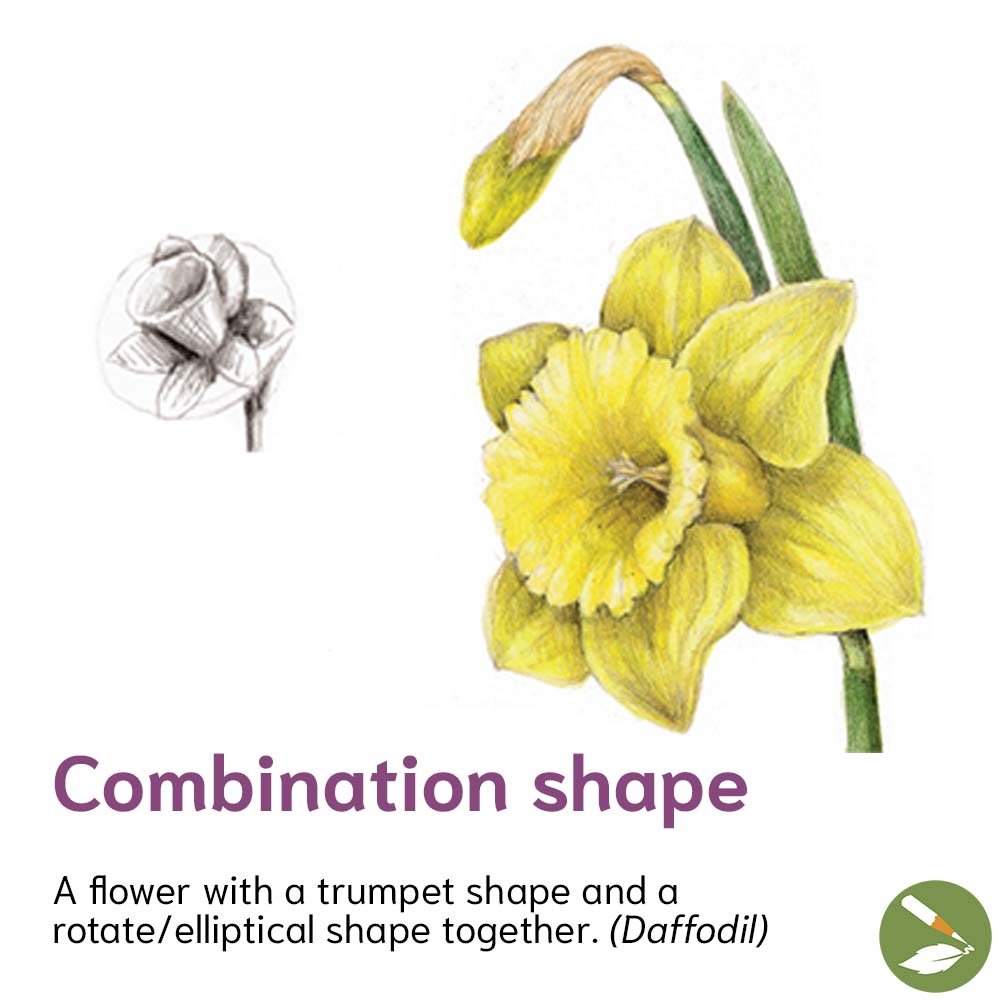
Combination shape
A flower with a trumpet shape and a rotate/elliptical shape together. (Daffodil)
The daffodil is a beautiful exercise in understanding how multiple forms coexist within a single bloom — the flat, circular perianth and the central trumpet (corona) each need to be understood in perspective relative to each other.
Symmetry: The Secret to Successful Flowers
Understanding a flower’s symmetry before you begin drawing is like having a map. It tells you where things should go and shows when something isn’t quite right.
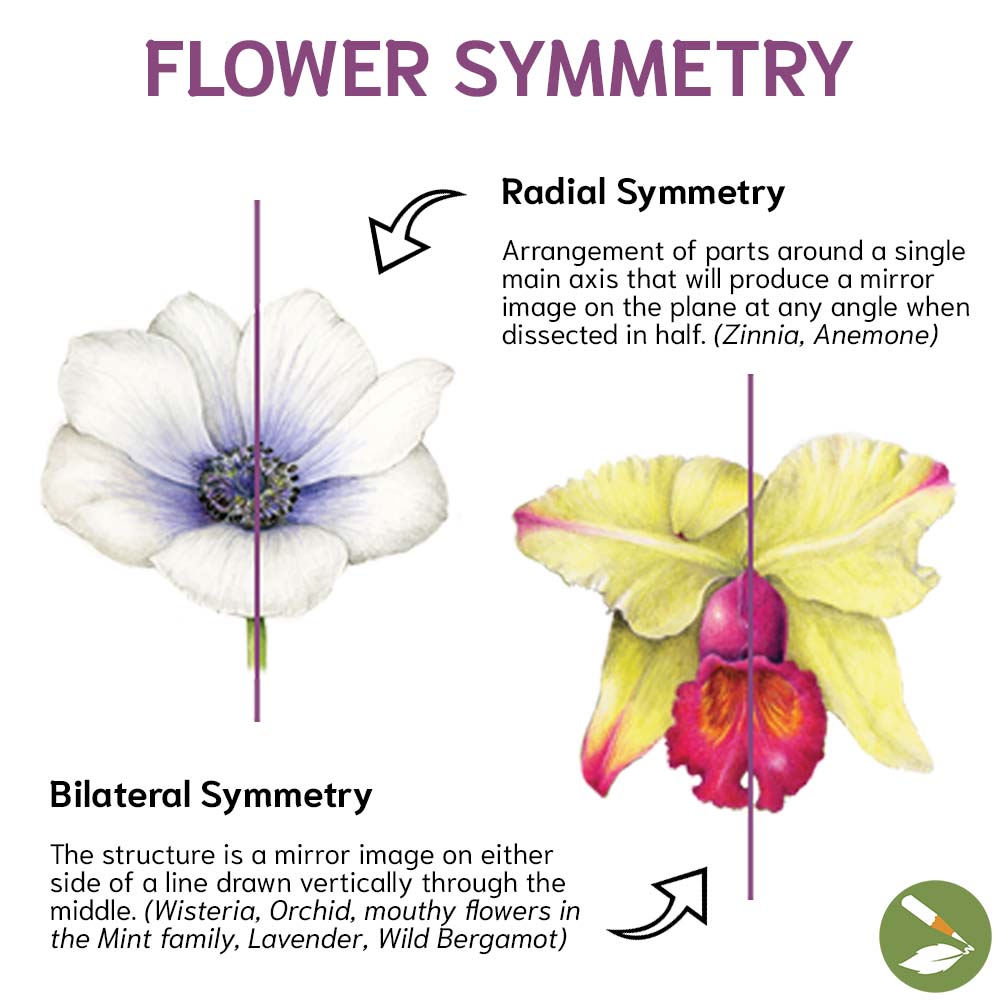
Radial Symmetry
Arrangement of parts around a single main axis that will produce a mirror image on the plane at any angle when dissected in half. (Zinnia, Anemone)
Radially symmetrical flowers are ideal subjects when you’re learning to draw from different perspectives, because the regularity of the form gives you a reliable framework to check your work against.
Bilateral Symmetry
The structure is a mirror image on either side of a line drawn vertically through the middle. (Wisteria, Orchid, mouthy flowers in the Mint family, Lavender, Wild Bergamot)
Bilaterally symmetrical flowers (also called zygomorphic) reward careful observation. Small deviations from perfect symmetry are part of what makes them so expressive and alive on the page. (Source: Natural History Museum of Utah)
Ready to Dive Deeper?
The best way to truly understand a flower is to draw one! Our course, The Practice of Botanical Drawing, takes you through everything covered here and so much more, with step-by-step video lessons, live workshops, and a warm, encouraging community of artists at every level. If you’re interested in a specific type of flower, we may have a recorded workshop you can watch! Check our Zoom Workshops Archives here.
DIY Reference Tools
Herbarium Page
To understand a flower, take it apart in a methodical way. Making an herbarium page will help you learn plant anatomy and the page will serve as a reference tool that will exist long after your live specimen. Once you’ve separated the parts of your flower, examine them through a magnifying glass to see details more easily. Cover the specimen with a piece of scrap paper and press under some heavy books. Your page will be dry in ~2 weeks.
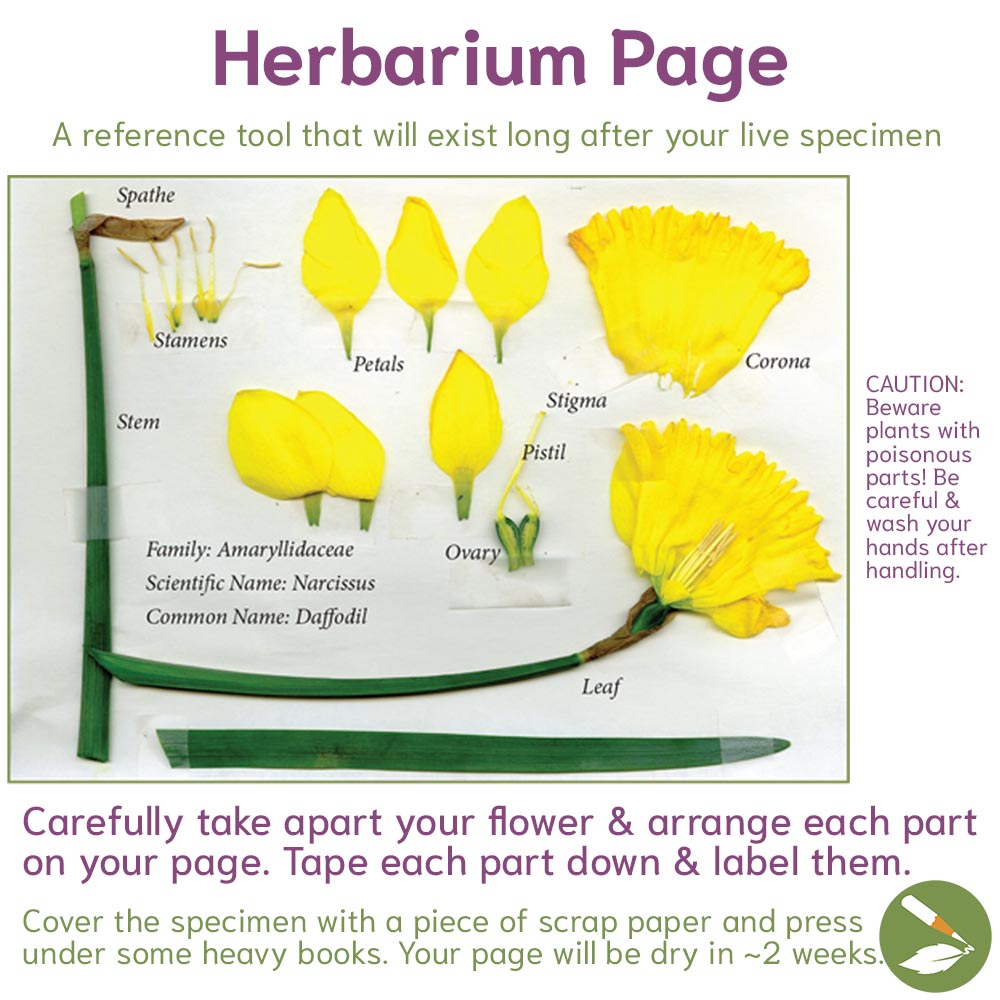
A la Emily Dickinson (yes, that Emily Dickinson), try arranging your next botanical drawing composition to tell a story: whether it is the biography of one plant over time, the connection between two, or the tale of your journey to the place where you discovered a flower. Read more about Emily Dickinson’s herbarium and see her entire digitized collection.
Caution: Beware plants with poisonous parts! Be careful & wash your hands after handling.
Study Page
Drawing the individual elements of the flower before attempting the entire structure can be less intimidating.
On your study page, consider including:
+ the number of petals
+ details about the reproductive parts and leaves
+ color mixing
+ any other things that intrigue you!
Challenge: Create a series of study pages as a document of the seasons!
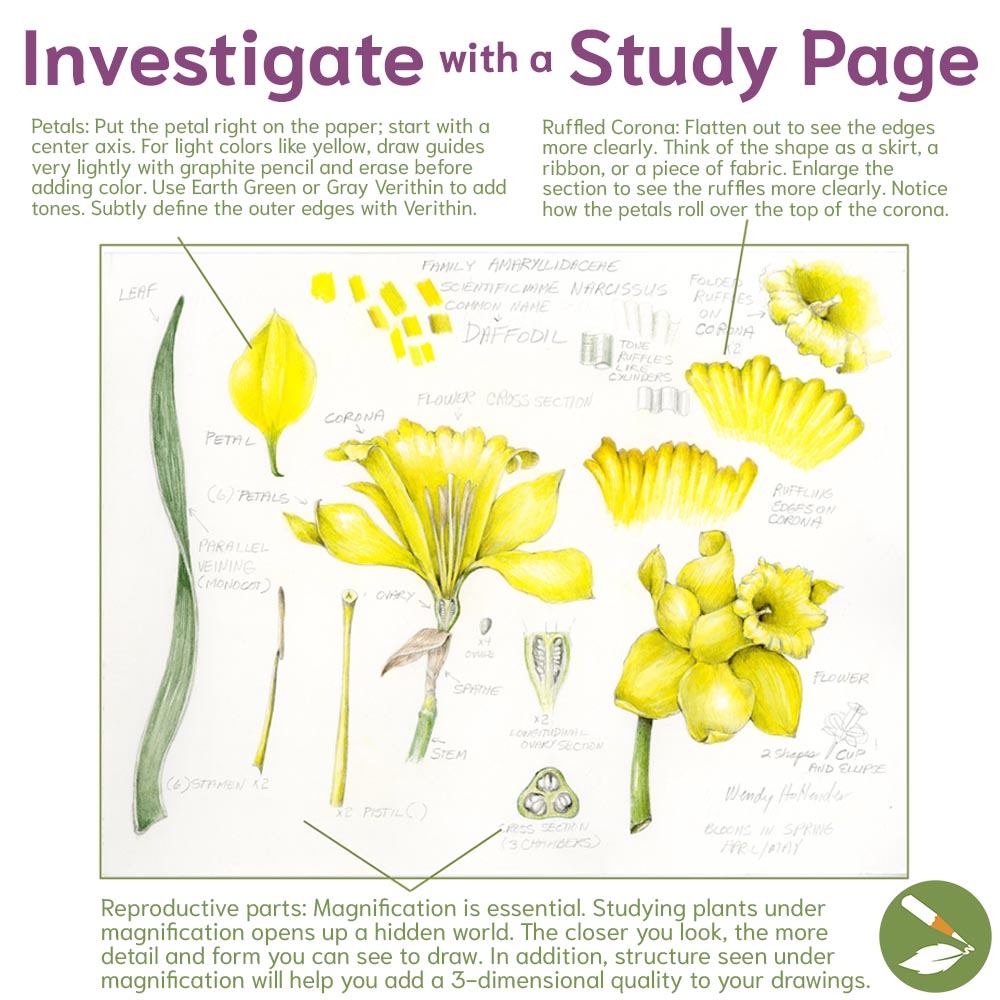
Petals
Put the petal right on the paper; start with a center axis. For light colors like yellow, draw guides very lightly with graphite pencil and erase before adding color. Use Earth Green or Gray Verithin to add tones. Subtly define the outer edges with Verithin.
Ruffled Corona
Flatten out to see the edges more clearly. Think of the shape as a skirt, a ribbon, or a piece of fabric. Enlarge the section to see the ruffles more clearly. Notice how the petals roll over the top of the corona.
Reproductive Parts
Magnification is essential. Studying plants under magnification opens up a hidden world. The closer you look, the more detail and form you can see to draw. In addition, structure seen under magnification will help you add a 3-dimensional quality to your drawings.
Check out this Joy of Botanical Drawing Video Companion on Measuring and Flower Shapes.
Frequently Asked Questions
Q: What is the easiest flower to start with for botanical illustration? Tubular flowers (like trumpet flowers or allamanda) are widely considered among the simplest for beginners because the three-dimensional form is clearly visible. Tulips, with their clean cup shape, are also a wonderful starting point. We have a free 12-step tulip tutorial to get you started!
Q: Do I need to know botany to draw botanical illustrations? No, but a basic understanding of flower anatomy (the petals, sepals, stamen, and pistil) goes a long way toward making your drawings more accurate and confident. You don’t need a science degree; curiosity and close observation are your most important tools.
Q: What is foreshortening and why does it matter in flower drawing? Foreshortening is the technique of representing a three-dimensional object on a flat surface by showing it from an angle. For botanical purposes, we focus on using circles that become ellipses — as you tilt a flower away from your direct line of sight, its circular face narrows into an ellipse. Mastering this transforms flat-looking drawings into ones that feel genuinely three-dimensional. Find our helpful post on perspective here.
Q: What is radial vs. bilateral symmetry in flowers? Radially symmetrical flowers (like zinnias and anemones) look the same from any angle through the center. Bilaterally symmetrical flowers (like orchids and lavender) have a single line of symmetry — left mirrors right, but top does not mirror bottom. Understanding which type you’re drawing helps you plan your composition and check your proportions.
Q: What is the difference between a complete and incomplete flower? A flower is considered complete if it contains the four main parts: petals, sepals, stamen, and carpel (pistil). If a flower lacks any one of these parts, it is an incomplete flower. (Source: Leafy Place)
Want to learn more about flowers and how to create herbarium and study pages?
Check out Lesson 5: Understanding a Flower in The Practice of Botanical Drawing.